B
Materials Needed
Traditional Materials
Rushes (most traditional):
- Soft rush (Juncus effusus) is ideal
- Harvest from wetlands (with permission)
- 16-20 rushes, 12-18 inches long
- Flexible when fresh or soaked
Reeds:
- Common reed (Phragmites australis)
- Similar to rushes in use
- Slightly stiffer
Wheat or oat straw:
- Readily available
- Traditional alternative
- Represents grain harvest
- Purchase from craft stores or farms
Modern Alternatives
If traditional materials aren't available:
- Raffia (natural fiber)
- Long grasses
- Cattail leaves
- Iris or daylily leaves
- Paper straws (for practice)
- Pipe cleaners (for children)
Additional Supplies
- Large bowl or bucket for soaking
- Water
- Scissors or knife
- String or ribbon for binding (optional)
- Towel
How to Make a Traditional Brigid's Cross
Preparation
- Gather materials: Collect 16-20 rushes or straws of similar length (12-18 inches)
- Soak: If using dried materials, soak in water for 30 minutes to 2 hours until pliable
- Prepare workspace: Clear flat surface, have towel ready
- Set intention: As you prepare, think about what you're creating and why
Step-by-Step Instructions
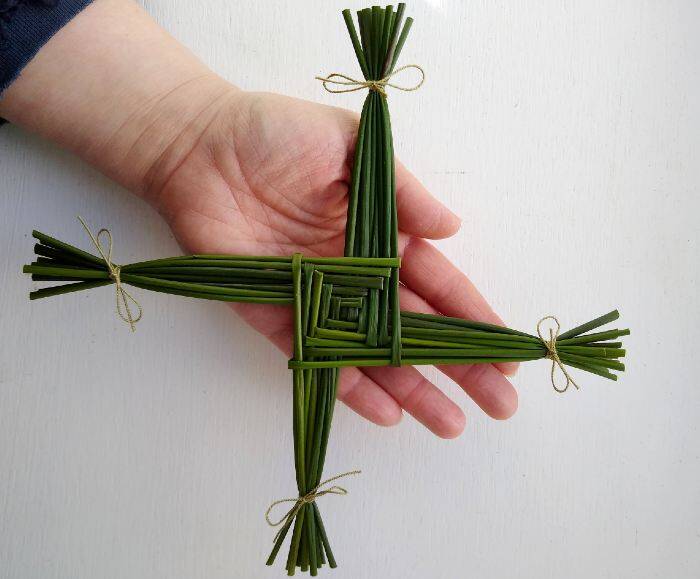
Step 1: Start the center
- Take one rush/straw, hold it vertically
- Take second rush, fold it in half around the middle of the first
- You now have a T-shape with the folded rush horizontal
Step 2: Begin weaving
- Rotate the cross 90 degrees counter-clockwise (so the folded rush is now vertical)
- Take third rush, fold it around the vertical piece
- You now have two rushes pointing in each direction
Step 3: Continue the pattern
- Keep rotating counter-clockwise after each addition
- Fold each new rush around the bundle that's currently vertical
- Push each new rush tight against the previous ones
- The center will form a square
- The arms will grow longer with each addition
Step 4: Add all rushes
- Continue rotating and adding rushes
- Maintain even tension
- Keep center square tight
- Use all your rushes (or until desired size)
Step 5: Secure the arms
- When all rushes are added, secure each arm
- Tie with string, ribbon, or a rush wrapped around
- Tie about 1-2 inches from the ends
- Trim ends evenly if desired
Step 6: Finishing
- Adjust the cross so all arms are equal length
- Tighten center if needed
- Let dry completely (24-48 hours)
- As it dries, it will tighten and become more rigid
Tips for Success
- Keep materials damp: Spray with water if they dry out while working
- Maintain tension: Pull each rush snug but not so tight it breaks
- Square center: This is the key to a good cross—keep it square, not diamond-shaped
- Even arms: Try to keep all four arms the same length
- Practice: Your first cross may be imperfect—that's okay! Each one teaches you
- Patience: Take your time, this is a meditation